Categories
Blog

Leg Press Machine: A Simple Guide to Powering Up Your Lower Body

Looking for a way to build stronger legs without stressing your back or needing a workout buddy? That’s where the leg press machine comes in. This gym favorite helps people of all fitness levels train their quads, hamstrings, glutes, and calves safely and effectively. Let’s break down what it is, how it works, and why it could be your lower body’s new best friend.

What Is a Leg Press Machine?

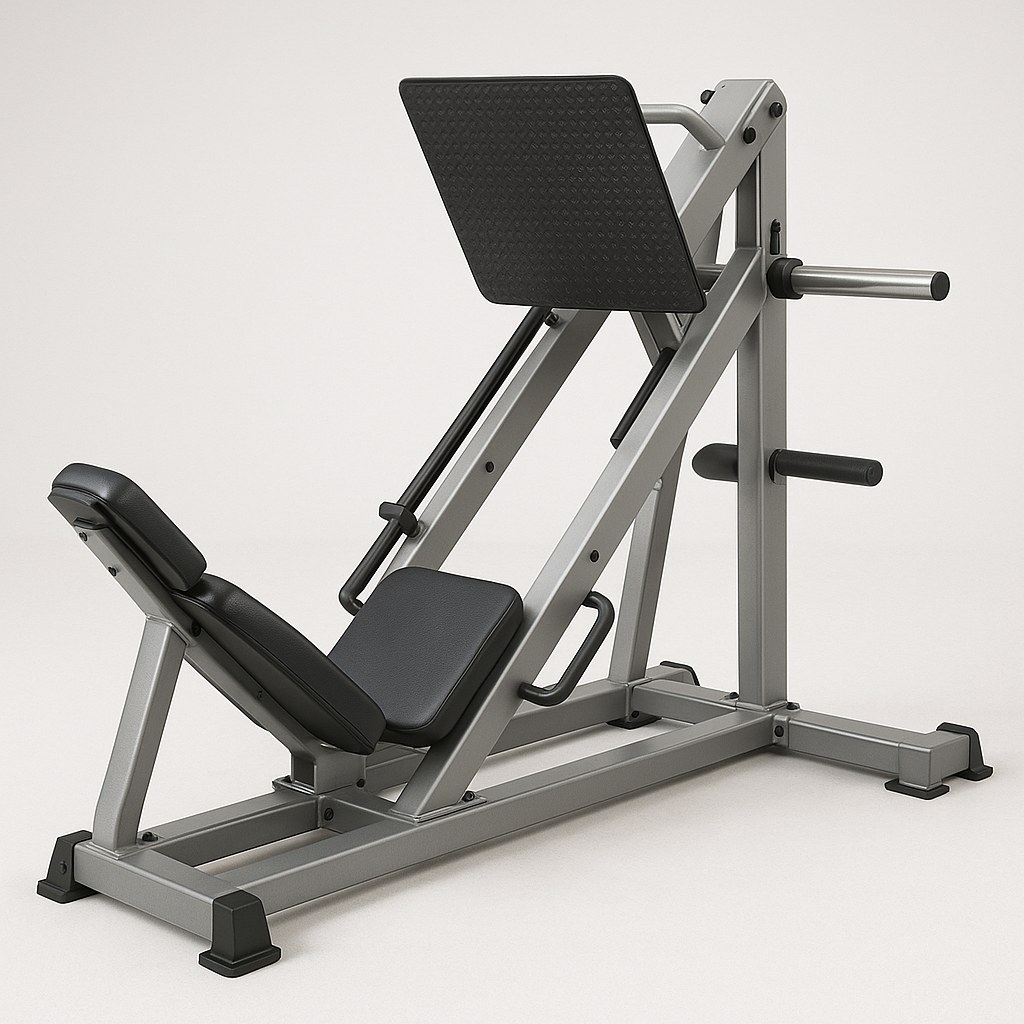
A leg press machine is a piece of gym equipment designed to help you push weight using your legs. You sit down, put your feet on a platform, and push the platform away from you by straightening your legs. The machine keeps the motion smooth and stable, so you can focus on your muscles.

There are two common types:

  • 45-Degree Leg Press (Incline): You sit back in a seat and push the weight upward at an angle.
  • Horizontal Leg Press (Seated): You sit upright and push the weight straight out in front of you.

Both work your legs in similar ways, but the angle can change how your body feels the weight. Some gyms may even offer variations with adjustable footplates or resistance types, like cables instead of weights.

How a Leg Press Machine Works

The machine uses weights (either weight plates or a weight stack) to create resistance. Your feet go on a large platform connected to the weights. When you push the platform away from you, your legs extend. Then, when you slowly let it come back, your legs bend again.

This movement mainly targets your quadriceps (front of your thighs), but it also works your glutes, hamstrings, and calves.

Because you’re seated with support behind you, your spine stays safe and steady. That’s one reason the leg press is popular with beginners or folks with back concerns.

It also eliminates the need for balance. Unlike squats or lunges, the leg press keeps you in a fixed position, allowing you to lift heavier weights without worrying about falling or straining your core.

Benefits of Using a Leg Press Machine

Let’s talk about why people love leg pressing with a machine:

  • Safe and supportive: Your back is supported, so it’s easy on your spine.
  • Focuses on form: The fixed motion helps you build good habits.
  • Builds leg strength fast: You can lift heavier than with bodyweight squats.
  • Great for beginners: Easy to use, even if you’re new to lifting.
  • Good for all fitness levels: Just adjust the weight for your needs.
  • Helps correct imbalances: Use one leg at a time to improve muscle balance.
  • Perfect for rehab and recovery: Low risk of falling or tweaking muscles.

And bonus: It’s simple to learn. You won’t need a spotter like you might with free weights.

Muscles Worked by the Leg Press

Here’s a quick look at the main muscles that get a boost:

  • Quads: The stars of the show. They do most of the pushing.
  • Glutes: These power your hips and help push the weight.
  • Hamstrings: Help control the movement and support the lift.
  • Calves: Assist at the bottom of the movement, especially if you press with your toes.

Switching up your foot position can target these muscles differently. For example:

  • Feet high: More glutes and hamstrings
  • Feet low: More quads
  • Feet wide: More inner thighs
  • Feet narrow: More outer quads

Try experimenting with your stance to see what feels best and works your goals.

How to Use the Leg Press Machine (Step-by-Step)

Here’s a simple guide for doing leg press with a machine:

  1. Sit down and adjust the seat so your knees are bent about 90 degrees.
  2. Place your feet shoulder-width apart on the platform.
  3. Grip the side handles for support.
  4. Push the platform slowly by straightening your legs, but don’t lock your knees.
  5. Lower the weight back down with control, bending your knees until they’re close to a 90-degree angle.
  6. Repeat for your chosen number of reps.

Start light and increase the weight as you get stronger. Always use smooth movements, and don’t rush.

For beginners, doing 3 sets of 10-12 reps is a good place to start. Make sure you’re breathing throughout the motion – exhale as you press up, inhale as you lower.

Tips for Better Results

  • Keep your heels on the platform: This keeps the work in your legs, not your knees.

  • Avoid locking your knees: Keeps pressure off your joints.

  • Control your pace: Slow and steady beats fast and sloppy.

  • Warm up first: Loosen your legs with bodyweight squats or light cardio.

  • Stretch after your workout: Keeps your muscles happy and flexible.

  • Stay consistent: One leg day won’t change your life. But a few months of leg press training will.

Common Mistakes to Avoid

Even though the leg press is beginner-friendly, here are a few things to watch for:

  • Going too deep: If your knees come too close to your chest, your lower back may round.

  • Too much weight: Lifting more than you can handle leads to poor form.

  • Knees locking or collapsing: Always keep a soft bend in your knees.

  • Fast, jerky reps: These reduce effectiveness and increase injury risk.

Raising your hips: Your back and glutes should stay on the seat. If your hips lift, the weight might be too heavy or your seat isn’t adjusted properly.

Leg Press vs. Hack Squat Machine

Another machine often compared to the leg press is the hack squat machine. They may look similar, but they serve different goals.

  • Leg Press: Focuses on pushing weight away from you while seated. It’s easier on the back and less complex.
  • Hack Squat: Mimics a squat, with the weight coming down on your shoulders. It targets similar muscles but requires more control and technique.

If you’re working out with both, try starting with the leg press to warm up and finish with hack squats for extra volume.

Leg Press vs. Squats: Which Should You Do?

You might wonder: is leg press better than squats?

Well, both have their place:

  • Squats work more muscles, including your core and balance.
  • Leg press keeps things simple and focuses on leg power.

Squats are great for total-body strength and functional movement. But the leg press shines when you want to go heavy on legs without overloading your back or needing a spotter.

The best workouts often include both, depending on your goals.

How to Add Leg Press to Your Workout Plan

Adding leg press to your weekly routine is easy. Here’s an example for a lower-body day:

  1. Warm-up: 5-10 minutes of cardio (bike or treadmill)
  2. Bodyweight squats: 2 sets of 15 reps
  3. Leg press machine: 3-4 sets of 10-12 reps
  4. Walking lunges: 2 sets of 20 steps
  5. Calf raises: 3 sets of 15
  6. Stretch and cool down

If you train legs twice a week, swap leg press variations (high foot placement one day, wide stance the next) to keep things fresh.

Who Should Use the Leg Press Machine?

Pretty much everyone! Here’s why:

  • Beginners: Easy to learn and low risk of injury
  • Older adults: Supportive and less strain on joints
  • Athletes: Great for power and strength training
  • People rehabbing injuries: Offers a controlled, safe environment
  • Anyone wanting strong legs: It works!

Whether your goal is sports performance, muscle growth, or just staying strong as you age, the leg press has a place in your workout.

What is a leg press machine good for?

A leg press machine is great for building strength in your quads, hamstrings, and glutes while supporting your back and keeping your body stable.

 Leg presses are easier on the joints and great for beginners, but squats work more muscles and help with balance and coordination.

 Sit with your back flat against the pad, feet shoulder-width on the platform, and push through your heels to extend your legs—don’t lock your knees.

The leg press has you pushing weight away while seated, while the hack squat has you standing and lowering yourself like a traditional squat with guided support.

The leg press machine is a solid choice for anyone wanting to grow stronger legs without the complexity of free weights. It’s beginner-friendly, powerful, and easy to adjust for all levels. You don’t need a spotter, it’s safe for your back, and it helps build strength fast. Plus, you can change foot placement to target different muscles for a well-rounded leg day.

So next time you hit the gym, give the leg press machine a try. Whether you’re just starting out or looking to switch up your routine, it’s one of the smartest moves you can make for your lower body.
Categories
Blog

Bench Press Machine: What It Is and How It Works

Looking to grow your chest muscles safely and with support? That’s where the bench press machine comes in. It’s one of the most popular strength training tools in gyms everywhere, and for good reason. Unlike free weights, this machine keeps your movement controlled, helping you target your muscles while reducing the risk of injury.

Let’s dive into how the machine bench press works, why people love it, and how you can make the most of it during your next workout.

What Is a Bench Press Machine?

A bench press machine is a piece of gym equipment designed to mimic the motion of a traditional bench press. Instead of using a barbell and weight plates, the machine offers a fixed path for pressing, using either a plate-loaded system or a weight stack that you adjust with a pin.

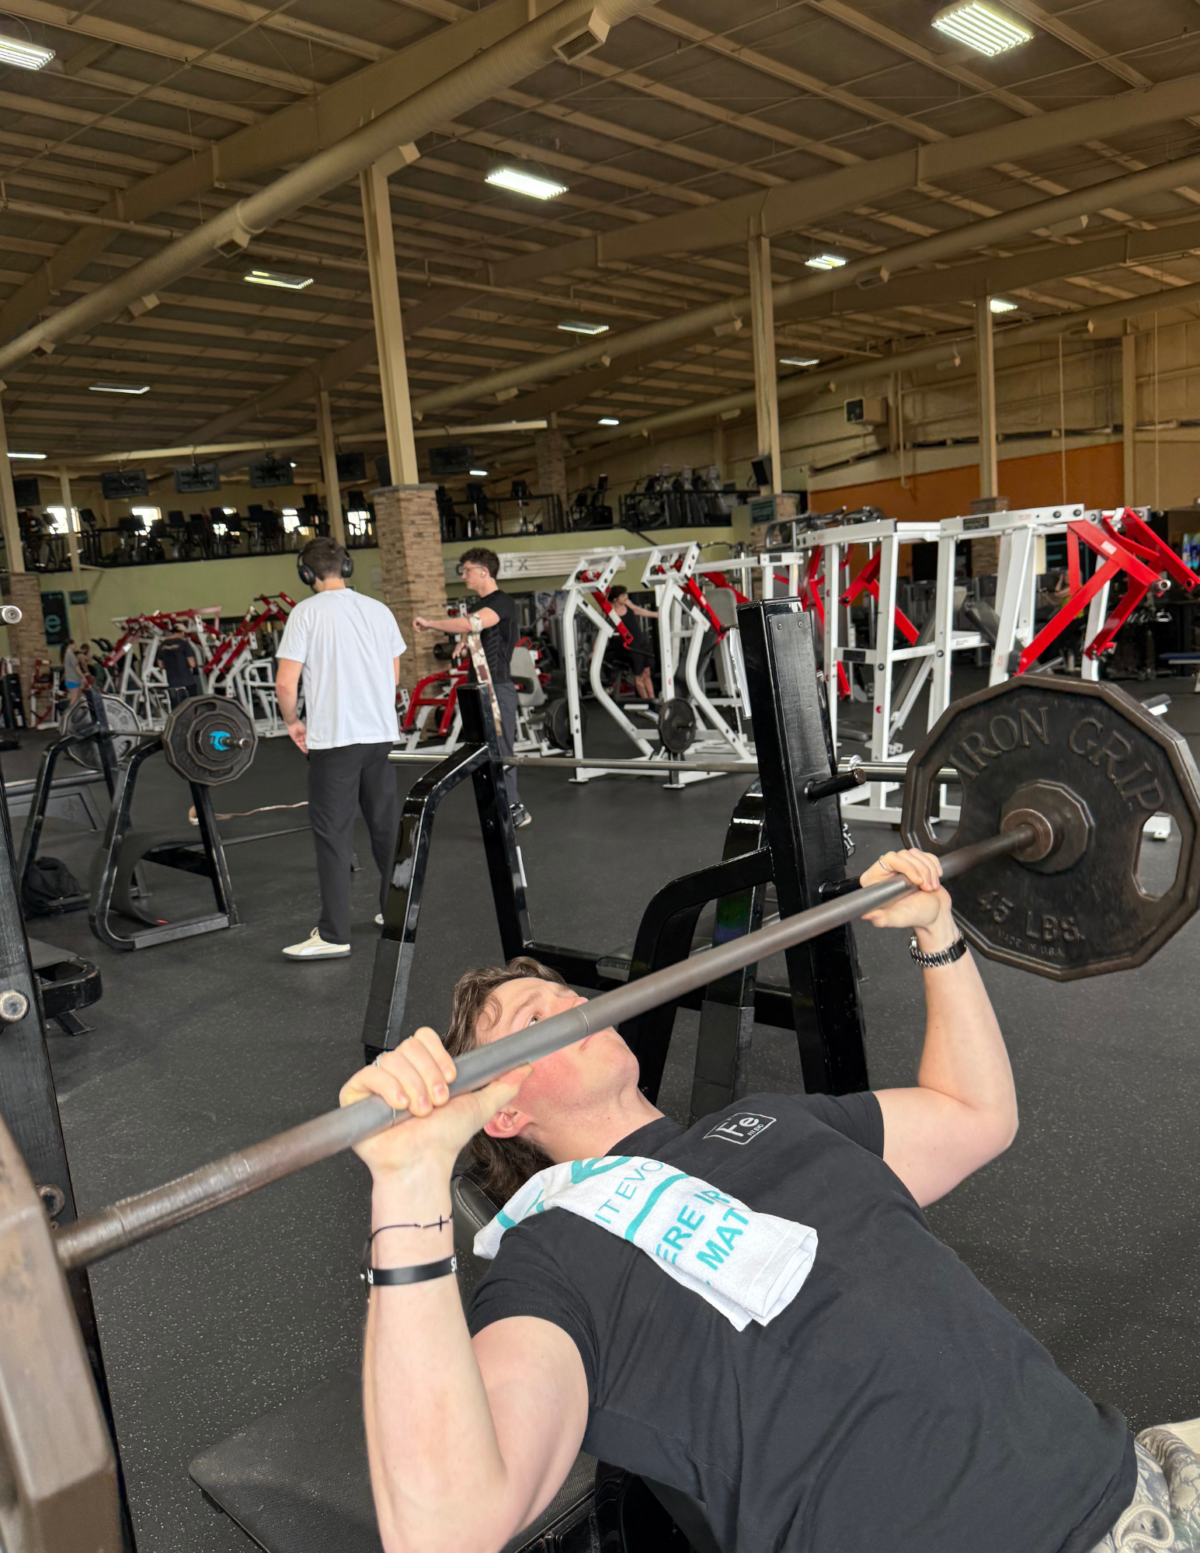
You’ll usually sit or lie back on a padded bench, grip the handles at chest level, and push them forward—just like you would with a barbell. But thanks to the machine’s design, it supports your arms and back the entire time, giving you better form and extra safety.

Bench press machines come in different forms and brands, but their goal is the same: help you work out your upper body in a way that’s safe, smooth, and straightforward.

Types of Machine Bench Press Setups

Not all machines are the same. Here are a few common types you’ll see in most gyms:

  • Seated Chest Press Machine: You sit upright with your feet flat on the floor and push handles forward from chest level. Great for beginners who want stability and ease of use.
  • Incline Bench Press Machine: Targets the upper chest by angling the bench upward. Think of it as a machine version of an incline bench press, shifting more of the load to the top part of your pecs.
  • Decline Bench Press Machine: This one leans you back so your head is lower than your hips. It focuses on the lower part of your chest and helps build that rounded shape.
  • Smith Machine Bench Press: A barbell is locked into a vertical or angled track, guiding your motion as you bench press. It gives more of a free weight feel but still offers support and safety features.

Some machines are dual-function, meaning they can be adjusted to incline or decline modes, giving you even more variety in one tool.

How a Bench Press Machine Works

The magic of the machine lies in how it guides your movement. Instead of relying on your stabilizing muscles (like with a barbell), the machine keeps the pressing motion steady. You don’t have to balance the weight—it’s all in one direction. That’s perfect for beginners or anyone recovering from injury.

Here’s a step-by-step of how it works:

  1. Adjust the seat height so the handles line up with the middle of your chest.
  2. Select your weight – either by adding plates or setting the weight pin.
  3. Grip the handles firmly and plant your feet flat on the ground.
  4. Push forward in a smooth motion, then slowly return to the start.

Repeat for your reps, and you’ve just crushed a machine bench press set! Most machines come with instructions printed on the side, and gym staff are usually happy to help if you’re unsure about setup.

Some machines use levers and pulleys, while others use direct resistance through weight stacks or cables. But no matter the type, the goal remains the same: help you train with purpose and precision.

Why Use a Machine Bench Press?

The bench press machine isn’t just a tool for beginners—it’s a solid workout for lifters at all levels. Here’s why we love it:

  • Safer than free weights: You don’t need a spotter, and there’s less risk of the bar slipping.
  • Controlled movement: Great for learning proper bench press form and avoiding bad habits.
  • Focus on muscle isolation: Target your chest, triceps, and shoulders without relying on your core or stabilizers.
  • Good for high-volume training: Since the movement is easier to control, you can do more reps safely without exhausting your stabilizers.
  • Helps reduce joint strain: Especially if you have shoulder issues, the guided movement reduces awkward pressure points.

It’s also great for supersets and drop sets. Since switching weights is quick, you can keep the intensity high with minimal rest.

Muscles Worked During a Machine Bench Press

You’re mainly hitting your pectoralis major – that’s your chest. But it doesn’t stop there. The machine bench press also activates:

  • Triceps brachii (back of your arms)
  • Anterior deltoids (front of your shoulders)
  • Serratus anterior (side of your rib cage)

With incline presses, you’ll hit the upper chest and shoulders more. With decline presses, you’ll shift more emphasis to the lower chest.

While you won’t use as many stabilizing muscles as you would with free weights, you’ll still get a great workout focused on strength and hypertrophy (muscle growth).

Tips for Getting the Most Out of the Machine Bench Press

Want results? Here’s how to level up your machine bench press:

  • Warm up first: Get your blood flowing with a few minutes of light cardio and dynamic stretches.
  • Keep your form tight: Don’t lock out your elbows at the top. Keep the movement smooth and steady.
  • Breathe right: Exhale as you push, inhale as you return.
  • Progress your weight: Add more resistance over time to build muscle.
  • Focus on tempo: Try slowing down the movement to challenge your muscles even more.
  • Avoid bouncing: Don’t let the weights slam down. Control is key.
  • Use full range of motion: Make sure your arms extend and retract fully to get the most out of each rep.

You can also use the machine for isometric holds by pausing midway during the push to build extra strength and endurance.

Who Should Use a Bench Press Machine?

This machine is for everyone, but it’s especially great for:

  • Beginners learning how to bench press
  • Older adults who want strength without stressing joints
  • Anyone rehabbing from an injury
  • Lifters on a chest day split who want to isolate muscles
  • People training alone without a spotter

Even advanced lifters use it as a finisher after heavy sets with dumbbells or barbells. It’s also handy for creating supersets with minimal rest between exercises.

How to Program the Machine Bench Press into Your Routine

You can add the machine bench press to your chest day or upper body routine. Here are a few ideas:

  • Beginner plan:
    • 3 sets of 10–12 reps, moderate weight
  • Muscle growth plan:
    • 4 sets of 8–10 reps, heavier weight with good form
  • Endurance plan:
    • 3 sets of 15–20 reps, lighter weight with short rest

Pair it with:

  • Dumbbell Flys
  • Cable Crossovers
  • Push-ups
  • Overhead Press
  • Tricep Dips

Mix it up to keep your routine fun and challenging.

What machines replace bench press?

Machines like the chest press, Smith machine, and pec deck can all replace the bench press by targeting the chest with similar push motions.

The most common machines are the chest press machine, incline/decline press machines, and the Smith machine, all of which allow for a safe, guided pressing motion.

Not exactly. The chest press machine typically targets the mid-chest in a flat position, while the incline bench press (machine or free weight) focuses more on the upper chest.

The traditional bench press recruits more stabilizer muscles and allows for natural bar movement, while the Smith machine offers safety and control. Each has its pros depending on your fitness goals.

No matter your fitness level, the bench press machine is a powerful tool for building strength, improving form, and training safely. It takes the pressure off your joints while helping you grow muscle in all the right places. Whether you’re just getting started or adding variety to your chest day, this machine fits right into your routine—easy to use, effective, and always ready when you are.

Categories
Blog

The Squat Machine Guide: What It Is, How It Works, and Why It Matters

Looking to grow strong legs or boost your lower body workouts? You’ve probably seen or heard of a squat machine. These machines are staples in gyms everywhere for one simple reason: they make squats easier, safer, and more focused. Whether you’re new to the gym or a seasoned lifter, understanding squat machines can help you train smarter.

Let’s break it down and explain what these machines are, how they work, and what sets a hack squat machine apart from the rest.

What Is a Squat Machine?

A squat machine is a piece of workout equipment designed to guide your body through a squatting motion. It takes some of the guesswork out of proper form and gives your joints more support during each rep. Unlike free barbell squats, which require balance and technique, a squat machine helps keep you steady.

These machines usually come in a few different types:

  • Hack squat machine
  • Smith machine (often used for squats)
  • Lever squat machine
  • Belt squat machine

All of them aim to do the same thing—help you perform squats safely with a focus on your legs, hips, and glutes.

How Does a Squat Machine Work?

Here’s the simple version: you load the machine with weights (or adjust the resistance), get into position, and squat. The machine keeps your body in a controlled path so you can focus on pushing through your heels and activating your muscles.

Key things the squat machine helps with:

  • Keeps your back supported
  • Controls your range of motion
  • Reduces the risk of tipping forward or backward
  • Targets muscles like the quads, hamstrings, glutes, and calves

The design of each type affects the feel of the movement. For example, a hack squat machine leans you back at an angle, while a Smith machine keeps the barbell fixed in place as you squat vertically.

What Is a Hack Squat Machine?

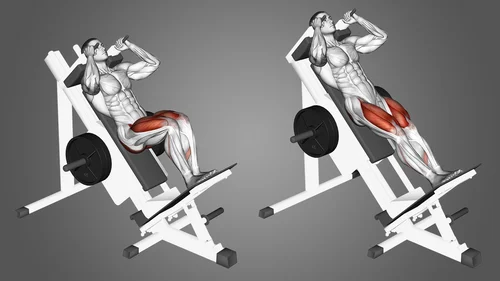
A hack squat machine is one of the most popular types of squat machines. It’s built on a slanted track and has padded shoulder supports. You stand on a foot platform and lean back into the pads.

When you squat, the machine moves along the angled rails. This puts extra focus on your quads while keeping your upper body supported. It’s a favorite for building muscle in the front of your legs.

Benefits of a Hack Squat Machine:

  • Takes pressure off your lower back
  • Great for targeting quads
  • Easier to maintain good form
  • Beginner-friendly and safe

You can also tweak your stance on the platform to change which muscles are working the most. Want more glute action? Place your feet higher. Want to feel the burn in your quads? Keep your feet lower and closer together.

Hack squats are also great because they allow for controlled progression. Since your body is supported, you can add weight more confidently and focus purely on leg strength.

Squat Machine vs. Free Weights

Let’s be real: barbell squats are amazing. But they aren’t for everyone.

A squat machine gives you control, safety, and structure. That’s why it’s great for beginners, those rehabbing an injury, or anyone who wants to train their legs without worrying about balance.

With a squat machine, you can:

  • Build strength safely
  • Try new angles or foot positions
  • Increase volume without burning out your stabilizer muscles

With free weights, you get:

  • More full-body engagement
  • Greater core activation
  • More challenge in terms of coordination

Machines isolate muscle groups better, but free weights train your whole body. For best results, many gym-goers use both. You can start your session with machine squats to pre-fatigue your legs and finish with bodyweight or dumbbell movements.

Tips for Using a Squat Machine

Here are some quick tips to get the most out of your squat machine workouts:

  • Warm up first. Always get your muscles ready before jumping into any squat machine.
  • Adjust your feet. Try wide stance, narrow stance, or even toes pointed out to hit muscles differently.
  • Control the movement. Go slow and feel the stretch at the bottom.
  • Don’t lock your knees. Keep a slight bend to protect your joints.
  • Breathe right. Exhale as you push up, inhale as you go down.
  • Start light. Test your range and comfort before stacking on the plates.
  • Keep your back flat. Don’t let your lower back round or arch off the pad.

The more attention you pay to your form, the more benefit you’ll get. These machines are tools—they work best when used with care.

Other Types of Squat Machines

While the hack squat machine is the star of the show, here are a few others worth knowing:

Smith Machine

A barbell fixed on rails. Great for beginners and easier to balance than free weights. You can squat straight up and down without worrying about tipping.

Belt Squat Machine

Loads weight on your hips instead of your shoulders. Good for people with back issues or spinal problems. It helps isolate your lower body without upper body strain.

Lever Squat Machine

This one uses arms and levers to simulate a squat movement. It’s more upright and great for mimicking the feel of a traditional squat without needing perfect balance.

Leg Press Machine

Not exactly a squat machine, but a very similar alternative. It’s a pushing motion rather than a true squat, but it targets many of the same muscles. Great for adding extra leg volume to your routine.

Each type of machine gives a slightly different feel. That’s why gyms often have more than one. Try them out and see which one works best for your body.

Common Mistakes to Avoid

Even with the help of a machine, form matters. Here are some common errors to steer clear of:

  • Letting your knees cave in – Keep them in line with your toes
  • Lifting your heels – Keep your feet flat for better power
  • Using too much weight too soon – Control matters more than heavy plates
  • Bouncing at the bottom – Slow and steady wins here

Arching your lower back – Stay planted and supported

Does a squat machine really work?

Yes, squat machines are highly effective for building leg strength and muscle by guiding your form and reducing injury risk.

It depends on your goals—machines offer more support and control, while free squats work more muscles and improve balance.

The best machine depends on your needs, but the hack squat machine is a top pick for targeting quads and supporting your back.

Both are great, but the V squat offers a more natural range of motion, while the hack squat provides more quad isolation.

Squat machines give your legs the workout they deserve—safely and effectively. They’re perfect for targeting muscles without the stress of free-weight squats, and they work for all fitness levels. If you want strong legs, a better lower body, and more confidence in your workouts, the squat machine is your friend.

Don’t sleep on the hack squat machine either—it’s one of the best ways to grow quads and push your limits. Plus, it helps you stay in control so you can challenge your muscles without compromising your joints.

So the next time you hit the gym, give one of these machines a try. Start slow, build up, and enjoy the strength gains that come with every rep.

Categories
Blog

Beginner Yoga Near Me: Your Friendly Guide to Starting Yoga Today

Looking for beginner yoga near me? You’re in the right place! Whether you’re brand new to yoga or just getting back into it, we’ve got you covered with everything you need to know. Let’s stretch into it together!

Why Try Beginner Yoga?

Beginner yoga is all about moving your body, breathing deeply, and feeling good. It’s perfect if you want to:

  • Feel less stressed
  • Move more easily
  • Get stronger and more flexible
  • Sleep better
  • Learn something new at your own pace

You don’t need to be flexible to start yoga. That’s what yoga helps with!

Practicing yoga helps your body feel balanced and your mind feel clear. With so many different styles out there, you can always find something that fits your vibe. Yoga isn’t just about poses; it’s about feeling better in your body and life.

What Happens in Beginner Yoga Classes?

Beginner yoga classes near me usually focus on gentle poses, deep breathing, and learning the basics. You might:

  • Sit on a mat and follow a teacher’s instructions
  • Try simple stretches and poses
  • Practice balancing and breathing slowly

Every class is a little different, but the goal is the same: to help you feel calm and strong.

Beginner classes move slowly. The instructor usually shows you how to do each pose and helps if you need it. You don’t need to know all the pose names or move like an expert. It’s totally okay to take breaks when you need to.

Types of Yoga for Beginners

Here are some of the most common types of yoga for beginners:

Hatha Yoga

  • Slow and easy to follow
  • Focuses on basic poses and breathing
  • Good for learning form and movement

Yin Yoga

  • Involves holding poses for longer
  • Great for relaxing your body and mind
  • Helps improve joint and tissue health

Vinyasa Yoga

  • More active with flowing movements
  • Beginner-friendly with the right instructor
  • Focuses on matching breath to movement

Restorative Yoga

  • Super gentle and peaceful
  • Uses props to help you relax in each pose
  • Great for stress relief and recovery

Chair Yoga

  • Perfect if getting on the floor is tough
  • Uses a chair for balance and support
  • Ideal for seniors or anyone needing low-impact movement

Trying out different styles is a great way to discover what feels best for you.

What to Bring to Your First Class

You don’t need much to get started. Just bring:

  • A yoga mat (some studios provide them)
  • Water bottle
  • Comfy clothes you can stretch in
  • A small towel (optional)
  • An open mind and a positive attitude

If you’re unsure what to bring, call ahead or check the studio’s website. They’ll usually list what you need.

How to Find the Best Beginners Yoga Near Me

Here are a few tips to find great classes:

  • Search for beginners yoga near me online
  • Check local gyms and fitness studios
  • Look for community centers or wellness clinics
  • Read reviews or ask friends for recommendations
  • Browse social media for local yoga instructors

Many studios offer your first class for free or have special deals for beginners. Don’t be shy to ask!

You can also look for:

  • Instructors certified in beginner-level classes
  • Studios with small class sizes for more attention
  • Trial packages or pay-per-class options

What If I’m Nervous?

That’s totally normal. Everyone in the room was a beginner once. Most yoga teachers are super friendly and will help you feel right at home. Go at your own pace, take breaks, and remember—you’re doing this for you.

You don’t have to be perfect. Yoga isn’t a competition. It’s about how you feel, not how you look. Let yourself enjoy the process. Even the most advanced yogis still learn new things all the time.

Benefits of Joining a Local Yoga Class

There are so many perks to joining a nearby class:

  • It keeps you motivated
  • You meet new people
  • It helps you build a routine
  • Teachers can help you with form and technique

Practicing in a group setting also helps you stay accountable. It can be easier to build a habit when you have a set time and place to go. Plus, being around others can boost your energy and mood.

How Often Should Beginners Do Yoga?

Two to three times a week is a great start. You don’t have to do it every day to feel better. Even just one class a week can help you feel more calm and clear-headed.

Once your body starts to adjust, you might want to go more often. Listen to your body and rest when you need to. Yoga is all about balance.

Can I Do Yoga at Home?

Yes, absolutely! Many people start at home using beginner yoga videos. There are tons of free resources online, including apps, YouTube videos, and virtual classes. Here are some ideas:

  • Follow along with beginner yoga instructors online
  • Use a yoga app with guided sessions
  • Set up a quiet space in your home with your mat

Still, nothing beats the support of an in-person class. It can help you stay motivated, get your posture right, and build confidence.

What Are Some Easy Poses for Beginners?

Here are five simple poses to get started:

  1. Mountain Pose (Tadasana)
  • Stand tall with feet together
  • Arms at your sides
  • Breathe deeply and feel grounded
  1. Child’s Pose (Balasana)
  • Kneel and sit back on your heels
  • Stretch arms forward and rest your head on the mat
  • Great for rest and relaxation
  1. Cat-Cow Pose
  • Start on your hands and knees
  • Arch your back up (Cat), then lower it and lift your chest (Cow)
  • Helps warm up your spine
  1. Downward Dog (Adho Mukha Svanasana)
  • From hands and knees, lift your hips up
  • Form an upside-down V shape
  • Stretches back, legs, and arms
  1. Seated Forward Fold (Paschimottanasana)
  • Sit with legs out straight
  • Reach toward your feet
  • Feel a gentle stretch in your legs and back

You can try these at home to get a feel for yoga before your first class.

What If I Have an Injury or Health Condition?

Always let your teacher know before class. Many yoga studios ask you to fill out a form with basic info. If something hurts or feels off, skip the pose or ask for a modification.

Chair yoga or gentle yoga classes are great options if you need something low impact. You can also ask your doctor before starting if you have health concerns.

Why People Love Beginner Yoga

People keep coming back to yoga because it helps them feel better. Here are some reasons beginners love it:

  • It helps manage stress and anxiety
  • You feel stronger and more balanced
  • Sleep improves
  • It builds confidence in your body
  • You feel part of a community

Yoga is for everyone. Every age, every shape, every background. You don’t need to be flexible, skinny, or spiritual to enjoy it.

What type of yoga should a beginner start with?

Hatha yoga is a great place to start because it moves slowly and teaches basic poses and breathing.

Two to three times a week is perfect for building a routine and seeing progress without overdoing it.

It’s best to start with classes labeled for beginners so you can learn at a comfortable pace with proper guidance.

Yes, beginner yoga can support weight loss by building strength, improving flexibility, and reducing stress, which can lead to healthier habits.

If you’ve been thinking about starting, this is your sign. Search for beginner yoga near me and try a class this week. Your body (and your brain) will thank you. You might walk in feeling nervous, but you’ll walk out feeling proud.

Your yoga journey starts with a single breath. So roll out your mat, take a deep inhale, and let the adventure begin.

Categories
Blog

The Best Forearm Workout Tools: Grip, Strength, and Gains

Looking for the best forearm workout tool to level up your grip strength? You’re in the right place. From classic hand grippers to more modern equipment, there are lots of ways to train your forearms and build strength that lasts. We’ll walk you through the most popular forearm workout tools, how they work, and why they matter.

Why Train Your Forearms?

Forearms do a lot of work behind the scenes. Whether you’re lifting, climbing, or even typing all day, these muscles help with grip, wrist stability, and control. Strong forearms make everything easier — from carrying groceries to hitting a personal best at the gym.

They’re also one of the most visible signs of strength. You might be able to hide weak quads or a soft core, but when your forearms are strong, it shows. For athletes, lifters, and everyday folks, training the forearms is key to full-body strength and balance.

In fact, many sports and activities rely on grip strength: tennis, rock climbing, baseball, gymnastics — even golf. Your forearms are central to all of them. And the better your grip, the better your performance across the board.

1. Hand Grippers: The Classic Tool

Let’s start with the fan favorite: the hand gripper.

  • What it is: A compact tool you squeeze with one hand. It offers resistance and helps build grip and forearm strength.
  • How it works: Repeated squeezing builds up endurance and muscle in the lower arm and hand.
  • Why it’s great: Small, portable, and easy to use anywhere.

Hand grippers are often considered the best forearm workout tool because they’re effective and beginner-friendly. You can use them while watching TV or during work breaks. Start with a lighter resistance and build your way up to heavier grips as your strength improves.

They also help reduce wrist fatigue and improve blood flow in your hands and forearms. For people who type or game for long periods, this tool can reduce strain over time.

2. Wrist Rollers

Another tried-and-true method for bigger, stronger forearms.

  • What it is: A stick or handle with a rope and weight attached.
  • How it works: You roll the weight up and down using wrist motion. It directly targets the forearms.
  • Why it’s great: It builds muscle endurance and wrist stability at the same time.

Wrist rollers are simple, but don’t underestimate their power. Just a few minutes of rolling can give you a serious burn. These tools are excellent for improving circulation and control, too. Plus, they activate both the flexor and extensor muscles of your forearms, giving you a balanced pump.

3. Forearm Blasters

These tools look intense — and they are.

  • What it is: Similar to a wrist roller, but designed for better grip and more resistance options.
  • How it works: You grip the handles and rotate to lift or lower a weight.
  • Why it’s great: Adjustable and heavy-duty, making it good for athletes and lifters.

Forearm blasters are perfect for people who want a more structured, serious workout. The handle and bar are ergonomically designed for optimal form. This tool works both the wrist flexors and extensors with balanced effort.

They’re also a great pick for injury prevention. Strong wrists and forearms can help shield the elbows and shoulders from strain, especially in contact sports or heavy lifting routines.

4. Finger Extensors

Balance matters. It’s not all about squeezing — sometimes, you need to stretch.

  • What it is: Bands or devices you place on your fingers to resist while spreading them out.
  • How it works: You open your hand against the resistance.
  • Why it’s great: It balances grip training and reduces risk of overuse injuries.

Your muscles need balance to stay healthy. These are especially good for climbers, musicians, and anyone who relies on strong, nimble hands. Bonus: they help improve finger mobility and reduce soreness after tough workouts.

They’re small, affordable, and easy to carry around. Plus, they promote recovery by working the muscles often overlooked in traditional strength routines.

5. Adjustable Grip Strengtheners

Customize your challenge with these modern hand grippers.

  • What it is: A modern upgrade to the classic hand gripper.
  • How it works: Tension can be dialed up or down, so you can train progressively.
  • Why it’s great: You don’t outgrow it quickly, and it suits all fitness levels.

This is often called the best forearm workout tool for beginners and pros alike. You can track progress and switch resistance on the fly, which makes it easy to fit your goals. Some models even come with built-in counters or digital tracking.

They’re great for warm-ups, cooldowns, or high-rep finishers. And because you control the tension, it’s easier to prevent overtraining.

6. Rice Bucket Training

Surprisingly simple and extremely effective.

  • What it is: A bucket filled with uncooked rice.
  • How it works: You dig, grab, twist, and move your hands in the rice.
  • Why it’s great: It hits every muscle in your forearms and hands.

This method is low-tech but works wonders for rehab and overall strength. Rice bucket training is a staple for baseball players and martial artists. It can improve range of motion and enhance grip diversity in a way that’s hard to beat.

You can create dozens of movement variations, from wrist curls to finger digs. It’s fun, effective, and very budget-friendly.

7. Fat Grip Attachments

Turn any dumbbell or barbell into a grip challenge.

  • What it is: Thick grips you attach to barbells, dumbbells, or pull-up bars.
  • How it works: The thicker grip forces your forearms to work harder.
  • Why it’s great: Great for increasing grip strength during regular workouts.

Fat grips add resistance without needing extra equipment. They’re excellent for compound lifts like deadlifts or curls. The extra width challenges your stabilizer muscles, and it’s easy to bring them with you to the gym.

Many athletes swear by these for increasing muscle activation in the forearms and hands. They also help break through plateaus by adding variety.

8. Sledgehammer Levers

A fun, old-school tool that targets wrist control.

  • What it is: A sledgehammer or long-handled weight.
  • How it works: Hold it at the end and slowly move it up and down using wrist control.
  • Why it’s great: Helps with wrist stability, endurance, and forearm size.

Start light — this workout is tougher than it looks! You’ll feel it deep in your forearm muscles, and it’s a great way to train wrist stability in multiple directions. You can also adjust intensity by changing hand placement.

If you’re into combat sports or functional strength, this tool translates well into everyday power and coordination.

9. Towel or Rope Pulls

Add variety to your pull strength routine.

  • What it is: Use a towel or rope to simulate pulling or climbing movements.
  • How it works: Pull and hold your bodyweight (or added weight) using towel grips.
  • Why it’s great: It builds dynamic grip strength with real-world application.

This is one of the easiest DIY methods. You can hang towels over pull-up bars or cable machines and replicate tough, raw grip work without needing fancy gear.

It’s also an excellent finisher or burnout set after a regular lifting workout. Your grip and forearms will be fully lit up after just a few rounds.

10. Gyro Balls (Powerballs)

Train with movement and momentum.

  • What it is: A handheld spinning ball that resists as you rotate your wrist.
  • How it works: Centrifugal force builds as you move your hand, creating resistance.

Why it’s great: It works the wrist and forearms while improving control and coordination.

Which Forearm Workout Tool is Best?

There’s no one-size-fits-all answer. But if we had to pick a best forearm workout tool for most people, it’d be a tie between:

  • Hand grippers for portability and ease
  • Adjustable grip strengtheners for versatility
  • Fat grip attachments for gym integration

If you like variety or train for a specific sport, don’t shy away from rice buckets, wrist rollers, or gyro balls. Mixing and matching tools can keep your routine fresh and hit all the right muscles.

Tips for Using Forearm Workout Tools

  • Start light: Don’t jump to heavy resistance right away.
  • Go slow: Focus on control, not speed.
  • Balance it out: Train both flexors and extensors.
  • Stay consistent: Like any workout, results come with time.
  • Track your reps: Even 5 minutes a day can lead to gains.
  • Recover right: Stretch, rest, and hydrate.

Mix it up: Don’t rely on just one tool. Cross-training keeps you sharp.

Do hand grippers actually build forearms?

Yes, hand grippers work the muscles in your forearms and hands by improving grip strength and promoting muscle growth with regular use.

Hand grippers, adjustable grip strengtheners, wrist rollers, and fat grip attachments are all top picks for effective forearm training.

Yes, wrist rollers are great for building muscle and endurance in the forearms by targeting both the flexors and extensors.

The best forearm exercises include wrist curls, reverse curls, hand gripper squeezes, and wrist roller routines for all-around strength and size

Training your forearms doesn’t need to be complicated. With the right forearm workout tools, like hand grippers, rice buckets, or wrist rollers, you can build strength, boost endurance, and protect your hands from fatigue and injury.

Whether you want a tool you can keep in your bag or a full setup for the home gym, there’s something for everyone. Try different tools and find what works best for your goals — and don’t skip forearm day!

Categories
Blog

Find Gyms Open Near Me: Fitness Evo Has You Covered

Looking for gyms open near you? At Fitness Evo, we keep our doors open early and late to help fit your lifestyle. Whether you’re just starting your fitness journey or you’re deep into your workout routine, we make it easy to stay consistent. Our facility is clean, fully equipped, and always welcoming. We’re right around the corner, and always ready when you are.

We're Not Just Open—We're Ready

It’s one thing to find a gym that’s open. It’s another to find one that motivates you to show up. At Fitness Evo, you’ll walk into an upbeat space filled with positive energy, knowledgeable staff, and everything you need to crush your goals. You’re not just stepping into a gym—you’re stepping into a space that wants you to win.

Here’s What You Can Expect:

  • Full weight room with dumbbells, barbells, and machines
  • Cardio area with treadmills, bikes, rowers, and more
  • Personal training available for that extra push

Our setup is designed to keep you inspired, whether you love lifting, running, stretching, or mixing it all together. You can train your way, with the tools you need and the support to keep going.

Why Fitness Evo Is the Best Gym Open Near You

There are plenty of gyms out there. But not every gym delivers the kind of experience that keeps you coming back. At Fitness Evo, we focus on the little things that make a big difference.

Here’s what sets us apart:

  • Extended hours: We’re open early and stay open late
  • Convenient location: Easy access no matter where you’re coming from
  • Friendly environment: We welcome all fitness levels, from total beginners to seasoned athletes
  • Affordable memberships: No hidden fees or tricky contracts
  • Clean facility: We clean constantly, so you never have to worry about hygiene
  • Supportive staff: We’re always here to answer questions, spot your lifts, or give helpful advice

When you type in “gyms open near me,” you don’t just want any gym. You want one that fits into your life, makes working out easier, and helps you stay on track. That’s what we do.

Your Schedule, Your Gym

We know life gets busy. That’s why our flexible hours are perfect for early risers, night owls, and everyone in between. Whether you’re swinging by before work or coming in late after a long day, we’re here for it.

What Makes a Great Gym?

A gym should be more than a building with equipment. It should feel like a second home. A space where you can grow stronger, healthier, and more confident. That’s what we aim for every day at Fitness Evo.

Here’s how we help:

  • Motivation: Our atmosphere pumps you up the moment you walk in
  • Inspiration: See others pushing themselves—it rubs off on you
  • Community: Friendly faces, high-fives, and real connections
  • Consistency: Our layout and programs help you stick to your goals

When you join Fitness Evo, you’re joining a community. Everyone’s on their own journey, but we’re all in it together.

Lorem ipsum dolor sit amet, consectetur adipiscing elit. Ut elit tellus, luctus nec ullamcorper mattis, pulvinar dapibus leo.

A Gym for Everyone

At Fitness Evo, we make it easy for everyone to get started. Whether you’re brand new to working out or have years of experience, we have something for you:

  • Beginner-friendly machines and intro classes
  • Experienced trainers who guide without judgment
  • Advanced equipment for serious lifters
  • Comfortable locker rooms and chill zones

And yes—we’re super proud of how inclusive and welcoming our environment is. You don’t have to be “fit” to walk through our doors. You just have to be ready to take the first step.

How do open gyms work?

Open gyms allow members to use the facilities freely during specified hours, without the need for a structured class or appointment.

An open gym membership typically gives you full access to the gym’s equipment, training areas, and courts during regular hours without any class-based restrictions.

If you stop paying, your membership may be suspended or canceled, and unpaid fees could be sent to collections depending on the contract terms.

Wear comfortable workout clothes and athletic shoes that allow you to move easily and stay cool during your workout.

Want a fun way to cross-train? Start your session with a few games of one-on-one, then hit the weights. Or jump into a class and cool down with some casual shooting afterward. However you do it, it works.

Categories
Blog

Find the Best Kickboxing Near Me: A Fun Way to Get Fit

Looking to get stronger, faster, and healthier? Kickboxing is the perfect way to do it! Whether you’re new to fitness or just want to shake things up, kickboxing classes offer an exciting mix of cardio, strength, and self-defense. It’s a workout that’s anything but boring. Plus, you’ll leave each session feeling accomplished, sweaty, and maybe even a little more confident.

Let’s talk about why kickboxing might be just what you need, what to expect, and how to find the best kickboxing classes near you.

What Is Kickboxing?

Kickboxing is a high-energy workout that combines punches, kicks, and fast-paced moves. It blends martial arts with cardio to help you burn calories, build muscle, and improve your coordination. You’ll often hear music pumping in the background, keeping your energy up and making the whole experience more fun.

It started as a combat sport but has grown into a popular fitness activity all over the world. You don’t have to be a fighter to take part. In fact, most people who search for “kickboxing near me” are looking for a great workout, not a black belt.

Some classes focus purely on fitness, using shadowboxing and air punches. Others may lean more into the self-defense side and even teach real striking techniques on pads or bags. But no matter the style, kickboxing will get your heart pumping.

Why Kickboxing Is a Great Workout

Kickboxing does a little bit of everything. It’s one of those workouts that keeps you on your toes—literally. Here are just a few reasons people love it:

  • Burn calories fast – You can burn up to 600-800 calories in one class! That’s a lot in under an hour.
  • Tone your body – All those punches and kicks work your arms, legs, and core. Your muscles will thank you.
  • Boost your confidence – Learning how to move and defend yourself feels empowering.
  • Stress relief – Had a tough day? Kick and punch it out in a healthy way.
  • Fun and exciting – Time flies when you’re moving to the beat and learning new combos.
  • Improve balance and coordination – Footwork and timing help you stay sharp, both mentally and physically.
  • Increase endurance – It’s a great way to build up your stamina while enjoying the process.

Plus, kickboxing doesn’t feel like a chore. It’s one of those workouts where you’re too busy having fun to realize how hard you’re working.

Who Can Do Kickboxing?

Anyone! Kickboxing classes are designed for all fitness levels. Whether you’re a beginner or already active, you can jump in and go at your own pace. Instructors often show different options for each move so everyone can follow along.

Even if you’ve never thrown a punch in your life, you’ll be fine. Most people in class are there to learn, not to compete.

There are even classes made just for kids or teens. Some places offer family sessions too, where everyone can have fun together. If you’re older or dealing with an injury, some studios offer low-impact versions or personal training options.

Kickboxing welcomes all ages, sizes, and skill levels. You don’t need to be in shape to start. You just need to show up and give it a try.

What to Expect in a Kickboxing Class

If you’ve never been to a class, here’s what a typical session might look like:

  • Warm-up – Think jumping jacks, stretches, and light cardio to get your body ready.
  • Technique training – You’ll learn how to throw punches and kicks with proper form.
  • Combinations – You’ll put moves together into combos, usually while following the instructor.
  • Strength and core – Some classes include pushups, planks, or other bodyweight exercises.
  • Cool down – Light stretching and breathing exercises to finish strong.

No two classes are the same. Some may use pads or bags, while others stick to shadowboxing. Some gyms even mix in music-based workouts or HIIT (high-intensity interval training) to keep it spicy. You might be using a punching bag one week and resistance bands the next.

And don’t worry if you feel a little lost at first. Everyone was new once. Just keep moving and the rest will come.

Different Types of Kickboxing Classes

When you’re searching for “kickboxing classes near me,” it’s good to know what kind of class you’re signing up for. Here are a few types you might run into:

  • Cardio Kickboxing: Focuses on fast-paced moves and burning calories. It’s like a dance party with punches.
  • Martial Arts Kickboxing: More traditional and technique-driven. You’ll learn real kickboxing skills.
  • Bag Classes: You’ll be striking heavy bags to build power and endurance.
  • Bootcamp Kickboxing: Adds weights, sprints, and high-intensity drills for extra burn.
  • Virtual Kickboxing: Online or on-demand classes you can do from home.

Pick the one that matches your goals. Want to lose weight? Go for cardio. Want to learn to defend yourself? Try martial arts-style.

How to Find the Best Kickboxing Classes Near Me

When searching for “kickboxing near me” or “kickboxing classes near me,” here are some tips to help you find the right spot:

  1. Check local gyms – Many gyms and fitness centers offer kickboxing as part of their class schedule.
  2. Look up martial arts studios – These often have more technique-focused classes.
  3. Use online maps and reviews – Search terms like “kickboxing near me” or “kickboxing classes near me” and check star ratings and reviews.
  4. Ask about trial classes – Lots of places let you try one class for free or for a low fee.
  5. Talk to the instructor – Ask questions about their experience, class size, and what to expect.
  6. Check the vibe – Visit the studio or watch videos if possible. You want a place where you feel welcome.

Also, ask about class schedules, costs, and any membership commitments. Some places let you pay per class, while others ask for a monthly membership.

What to Bring to Your First Class

Getting ready is easy! Here’s what you might need:

  • Water bottle (you will get thirsty!)
  • Workout clothes (something comfy you can move in)
  • Clean gym shoes
  • Towel (you’ll sweat!)
  • Hand wraps or gloves (some studios provide them, others don’t)

If you’re unsure, call ahead. Most places are happy to let you know what to bring.

Kickboxing at Home

If you can’t make it to a gym, there are online kickboxing classes too! All you need is a bit of space and a screen. You can find follow-along videos that guide you through workouts right in your living room.

Apps and streaming services offer everything from beginner tutorials to full-on training plans. Some even let you track your progress and set goals.

It’s not quite the same energy as being in class, but it’s a great way to get started or keep up your routine.

Kickboxing Safety Tips

  • Warm up properly to prevent injuries.
  • Start slow if you’re new. Don’t try to master everything in one class.
  • Focus on form over speed or power.
  • Listen to your body – If something feels off, take a break.
  • Stay hydrated before, during, and after your workout.

Most importantly, have fun and don’t be too hard on yourself. Progress takes time.

Why People Love Kickboxing

Here are just a few reasons people keep coming back for more:

  • “It’s the only workout I actually enjoy.”
  • “I feel stronger and more confident.”
  • “It helped me lose weight and gain muscle.”
  • “I can finally keep up with my kids.”
  • “I punch away the stress of the day.”

Kickboxing is more than a workout. It’s a way to feel good inside and out.

How much does it cost for kickboxing?

Kickboxing classes typically range from $10 to $30 per session, with monthly memberships available at many gyms for $50 to $150 depending on location and amenities.

Yes! Kickboxing is beginner-friendly and most classes offer modifications so you can go at your own pace while learning the basics.

Absolutely. Kickboxing is a great calorie-burning workout that also builds muscle and boosts metabolism, making it effective for weight loss.

Yes, attending kickboxing twice a week can help improve fitness, build skills, and support weight loss goals when paired with a balanced lifestyle.

Ready to put yourself out there!

Try Kickboxing Today! If you’re ready to feel strong, confident, and energized, kickboxing is a great choice. Whether you’re searching for a fun fitness class or want to learn real self-defense skills, there’s a kickboxing class out there for you.

Just search “kickboxing near me” or “kickboxing classes near me” and see what exciting options pop up in your neighborhood. Show up, give it a try, and enjoy the journey.

Your future self will be glad you did!

Categories
Blog

Ozempic for Weight Loss: What You Need to Know

Ozempic has been making waves as a weight loss option, but what exactly is it, and how does it actually work? Many people are turning to this medication in hopes of shedding pounds, but it’s important to understand the facts before making any decisions. Before diving in, let’s be clear: we are not doctors, and this is not medical advice. Always consult with a healthcare professional before starting any medication, including Ozempic.

What Is Ozempic?

Ozempic (semaglutide) is an injectable medication originally designed to help manage type 2 diabetes. It belongs to a class of drugs called GLP-1 receptor agonists, which help regulate blood sugar levels. While it was initially intended for diabetes management, research and real-world results have shown that Ozempic can also aid in weight loss.

Because of its effectiveness, Ozempic has gained widespread attention, particularly among those looking for alternatives to traditional diet and exercise plans. However, just because a medication helps with weight loss doesn’t mean it’s suitable for everyone. That’s why it’s crucial to learn how it works and whether it might be the right option for you.

How Does Ozempic Work for Weight Loss?

The primary function of Ozempic is to mimic a natural hormone in the body called GLP-1 (glucagon-like peptide-1). This hormone plays a vital role in regulating blood sugar levels, insulin production, and digestion. But what makes it particularly interesting for weight loss is how it affects hunger and food intake.

Here’s how Ozempic works in the body:

  • Slows Digestion: One of the ways Ozempic promotes weight loss is by slowing down the digestive process. This means food stays in the stomach longer, helping people feel fuller for extended periods and reducing overall calorie intake.
  • Reduces Appetite: The medication interacts with brain receptors that control hunger, leading to decreased food cravings and portion sizes. This can be especially beneficial for individuals who struggle with overeating or emotional eating.
  • Regulates Blood Sugar: By helping to stabilize blood sugar levels, Ozempic prevents spikes and crashes that often lead to cravings for sugary or high-calorie foods.

For these reasons, many people have found Ozempic to be a helpful tool in their weight loss journey. However, it’s not a standalone solution. Combining it with a healthy diet and regular exercise can maximize its effectiveness.

Ozempic Dosing for Weight Loss

Ozempic is a prescription medication, which means dosing must be determined by a healthcare provider. The amount needed can vary from person to person, and doctors will typically adjust the dose based on an individual’s response to the medication.

Here is a general overview of how Ozempic is typically prescribed:

  • Starting Dose: Most people begin with a low dose of 0.25 mg once a week for the first four weeks. This allows the body to adjust to the medication and helps minimize side effects.
  • Increasing the Dose: After the initial four weeks, the dose is usually increased to 0.5 mg per week.
  • Maximum Dose: Depending on an individual’s response, the dose may be increased up to 1.0 mg or even 2.0 mg per week, as prescribed by a doctor.

It’s essential to follow a doctor’s instructions for dosing, as taking too much or too little can impact effectiveness and lead to unwanted side effects.

Potential Side Effects of Ozempic

Like any medication, Ozempic comes with potential side effects. Some people tolerate it well, while others may experience mild to severe reactions. The most common side effects include:

  • Nausea

  • Vomiting

  • Diarrhea

  • Constipation

  • Stomach pain

More serious side effects can include:

  • Pancreatitis (inflammation of the pancreas)

  • Gallbladder issues

  • Thyroid tumors (rare but a potential risk, as seen in animal studies)

Because of these risks, it’s crucial to talk to a doctor before considering Ozempic for weight loss. They can help determine whether the benefits outweigh the risks based on an individual’s health history.

Who Should NOT Take Ozempic?

Not everyone is a candidate for Ozempic. Some people should avoid it altogether, including those who:

  • Have a personal or family history of thyroid cancer or multiple endocrine neoplasia syndrome

  • Have a history of pancreatitis

  • Are pregnant or breastfeeding

  • Have severe gastrointestinal issues

Again, a doctor is the best resource for determining whether Ozempic is a safe option for an individual’s unique health circumstances.

How Effective Is Ozempic for Weight Loss?

Clinical trials and real-world use suggest that Ozempic can lead to significant weight loss when used consistently and as prescribed. Some studies have shown that individuals using Ozempic may lose 10-15% of their body weight over time.

However, results can vary. Some people may experience more significant weight loss, while others may see only minor changes. Factors such as diet, exercise, and individual metabolism all play a role in the overall outcome.

Ozempic vs. Other Weight Loss Medications

Ozempic isn’t the only medication available for weight loss. Other similar drugs include:

  • Wegovy (semaglutide): This is a higher-dose version of semaglutide specifically approved for weight loss.

  • Mounjaro (tirzepatide): Another GLP-1 receptor agonist that has shown promising weight loss effects.

  • Phentermine: A commonly prescribed appetite suppressant.

  • Orlistat: A medication that blocks fat absorption in the body.

Each of these medications works differently, and what’s best for one person may not be best for another. Consulting with a healthcare provider can help determine the most suitable option.

Is Ozempic a Long-Term Solution?

One common question is whether Ozempic is meant to be taken long-term. The answer depends on the individual. For some, Ozempic may be a temporary tool to jumpstart weight loss, while others may need to continue taking it to maintain their results. However, stopping Ozempic suddenly can lead to weight regain, so it’s essential to discuss a long-term plan with a healthcare provider.

How much weight can you lose in a month with Ozempic?

Most people lose between 4-10 pounds in the first month, depending on factors like diet, exercise, and metabolism.

Doctors may prescribe Ozempic for weight loss, especially for individuals with obesity or weight-related health conditions, though it is primarily FDA-approved for diabetes.

Yes, studies and real-world results show that Ozempic helps people lose weight by reducing appetite, slowing digestion, and stabilizing blood sugar levels.

Some people begin noticing weight loss within the first few weeks, but more significant results typically appear after a few months of consistent use.

Ozempic has gained popularity as a weight loss aid, but it’s not for everyone. While it can be an effective tool, it should be used in combination with healthy lifestyle changes for the best results. Additionally, because we are not doctors, this article is not medical advice. Always consult with a qualified healthcare provider before starting or stopping any medication.

If you’re curious about whether Ozempic might be right for you, reach out to a medical professional to explore your options. Ready to take the next step? Contact your doctor today to discuss whether Ozempic is a good fit for your weight loss journey!

Categories
Blog

Side Effects of Ozempic: What You Need to Know

Ozempic (semaglutide) is a prescription medication primarily used to manage type 2 diabetes. Recently, it has gained popularity for its potential weight loss benefits. However, like any medication, it comes with potential side effects. We are not doctors, and this article should not be taken as medical advice. Always consult a healthcare professional before making decisions about your health.

What Is Ozempic and How Does It Work?

Before diving into the side effects, it is helpful to understand how Ozempic works. Ozempic belongs to a class of drugs known as GLP-1 receptor agonists. It works by mimicking a hormone in the body called glucagon-like peptide-1 (GLP-1), which regulates blood sugar levels, slows digestion, and reduces appetite. Because of its effects on digestion and appetite, many people have turned to Ozempic for weight loss, even though it was originally developed for diabetes treatment.

However, while Ozempic may offer benefits, it is crucial to be aware of its potential side effects.

What Are the Side Effects of Ozempic?

Understanding how Ozempic affects the body can help individuals make informed decisions about its use. Some side effects may be mild and temporary, while others could be more serious.

Common Side Effects

Many people experience mild to moderate side effects when taking Ozempic. These include:

  • Nausea – One of the most frequently reported side effects, especially when starting the medication.
  • Vomiting – Some individuals may experience an upset stomach leading to vomiting.
  • Diarrhea – Changes in digestion are common as the body adjusts.
  • Constipation – Some users report difficulty in bowel movements.
  • Stomach Pain – Mild to moderate abdominal discomfort can occur.
  • Fatigue – A general feeling of tiredness may accompany the use of Ozempic.

These symptoms often improve as the body adjusts, but if they persist, consult a doctor.

What Are the Bad Side Effects of Ozempic?

While most side effects are manageable, some can be more severe. These include:

Serious Side Effects

If you experience any of the following, contact a healthcare professional immediately:

  • Pancreatitis – Severe stomach pain that does not go away could indicate inflammation of the pancreas.

  • Gallbladder Problems – Symptoms such as pain in the upper right abdomen, nausea, and vomiting could signal gallstones or other gallbladder issues.

  • Kidney Problems – Dehydration caused by vomiting or diarrhea may lead to kidney complications.

  • Thyroid Tumors – Some studies suggest a possible link between Ozempic and thyroid tumors. Symptoms like swelling in the neck or trouble swallowing should be taken seriously.

  • Allergic Reactions – If you experience swelling, difficulty breathing, or a severe rash, seek medical attention immediately.

Other Considerations and Long-Term Effects

Some side effects of Ozempic may not appear immediately. Research on the long-term effects of the medication is still ongoing, but some concerns have been raised regarding its impact on metabolism, hormone levels, and organ function.

Potential Long-Term Risks

  1. Gastrointestinal Issues – Since Ozempic slows digestion, long-term use may lead to chronic gastrointestinal problems.

  2. Dehydration – Persistent vomiting or diarrhea could lead to dehydration and electrolyte imbalances.

  3. Muscle Loss – Rapid weight loss associated with Ozempic use may also result in muscle loss, which can be problematic for overall health.

Blood Sugar Drops (Hypoglycemia) – While Ozempic helps regulate blood sugar, it could lead to dangerously low levels, particularly in those who take other diabetes medications.

Who Should Avoid Ozempic?

Ozempic may not be suitable for everyone. People with the following conditions should consult a doctor before taking it:

  • History of pancreatitis
  • Family history of thyroid cancer
  • Severe gastrointestinal issues
  • Pregnant or breastfeeding women
  • Those with kidney disease

Additionally, Ozempic is not approved for individuals with type 1 diabetes or those who experience diabetic ketoacidosis.

Is Ozempic Safe for Weight Loss?

Many people who do not have diabetes are now using Ozempic as a weight loss aid. While some individuals experience significant weight loss, the medication is not without risks.

Weight Loss Benefits vs. Risks

  • Benefits:

    • Reduces appetite and cravings

    • Leads to gradual, sustainable weight loss

    • Helps improve insulin sensitivity

  • Risks:

    • Potential for severe nausea and gastrointestinal distress

    • Weight regain if the medication is stopped

    • Possible long-term metabolic effects

Weight loss with Ozempic may seem appealing, but it is essential to balance potential benefits with possible risks. If you are considering using Ozempic for weight loss, consult a doctor to discuss the safest approach.

Should You Take Ozempic?

Deciding whether Ozempic is right for you should be based on professional medical advice. While it has benefits, such as blood sugar control and potential weight loss, the side effects can be significant. Always speak with your doctor before starting or stopping any medication.

If you experience severe side effects, such as persistent vomiting, intense abdominal pain, or signs of an allergic reaction, seek immediate medical attention.

Alternatives to Ozempic

If you are concerned about Ozempic’s side effects, there are other options for managing diabetes and weight loss. These include:

Other Medications

  • Trulicity (Dulaglutide) – Another GLP-1 receptor agonist with similar effects.

  • Metformin – A common diabetes medication that helps with blood sugar control.

  • Mounjaro (Tirzepatide) – A newer medication that also aids in weight loss.

Lifestyle Changes

  • Dietary Adjustments: Reducing processed foods and increasing whole foods can support weight loss and blood sugar control.

  • Exercise: Regular physical activity can improve insulin sensitivity and help with weight management.

Intermittent Fasting: Some people find that fasting helps regulate insulin and aids in weight loss.

Is Ozempic Hard on the Body?

Ozempic affects individuals differently. Some people tolerate it well, while others experience significant side effects. Common complaints include nausea, vomiting, diarrhea, and fatigue, especially when first starting the medication. More serious side effects like pancreatitis, kidney problems, and gallbladder issues may occur in some cases. Because Ozempic slows digestion, it can also cause bloating and discomfort. If side effects become severe or persistent, consulting a doctor is crucial.

Certain medications may interact negatively with Ozempic, potentially increasing the risk of side effects or reducing the drug’s effectiveness. Some medications to be cautious with include:

  • Insulin or other diabetes medications – Using Ozempic alongside insulin or sulfonylureas (like glipizide or glyburide) can increase the risk of hypoglycemia (low blood sugar).

  • GLP-1 receptor agonists – Taking multiple medications from the same drug class (such as Trulicity or Mounjaro) is not recommended.

  • Medications that affect digestion – Ozempic slows gastric emptying, so drugs that rely on rapid absorption (such as some antibiotics and oral contraceptives) may not work as effectively.

  • Blood pressure or kidney medications – Since Ozempic may impact kidney function, medications like diuretics or ACE inhibitors should be monitored by a doctor.

Always inform your healthcare provider about any medications or supplements you are taking before starting Ozempic.

Recent warnings have highlighted potential risks associated with Ozempic, including:

  • Increased Risk of Gastroparesis (Stomach Paralysis) – Some patients have reported delayed stomach emptying leading to severe nausea and vomiting.

  • Gallbladder Disease – Studies suggest an increased risk of gallstones and gallbladder inflammation.

  • Suicidal Thoughts or Mood Changes – Some users have reported experiencing depression or suicidal ideation while taking Ozempic.

  • Thyroid Cancer Risk – Although rare, Ozempic carries a warning about a potential link to medullary thyroid carcinoma.

Patients should discuss these risks with their doctor, especially if they have a history of these conditions.

Many users report regaining weight after stopping Ozempic. Since the medication works by reducing appetite and slowing digestion, these effects disappear once it is discontinued. Without Ozempic, hunger levels may return to normal, leading to increased calorie intake. Studies suggest that maintaining weight loss requires long-term lifestyle changes, such as:

  • Sticking to a balanced diet

  • Continuing regular physical activity

  • Managing portion sizes

  • Considering alternative weight management strategies

For those who stop Ozempic, working with a healthcare provider or nutritionist can help create a sustainable plan to prevent weight regain.

Final Thoughts

While Ozempic can be an effective medication, it is essential to be aware of its potential side effects. If you experience any concerning symptoms, reach out to a healthcare professional immediately.

We are not doctors, and this information is not a substitute for professional medical advice. Always discuss any concerns about medication with a qualified healthcare provider.

Want to learn more about health and wellness? Contact us today!

Categories
Blog

Jump Rope on Mat: Why It Might Be Your New Favorite Workout Trick

If you love jumping rope, you know it’s one of the fastest ways to get your heart racing and muscles working. But did you know where you jump matters too? Yep! Today we’re talking about why jump rope on mat could be a total game changer.

Before we get too far, remember: we are not doctors, and this isn’t medical advice. We’re just sharing our best tips to help you stay happy, healthy, and having fun!

Why Should You Jump Rope on a Mat?

Jumping rope on a mat isn’t just about looking fancy at the gym. It actually helps a lot! Here’s why:

  • Protects your joints: Hard surfaces like concrete can be tough on your knees, ankles, and hips. A soft mat gives you a little cushion.
  • Stops slipping: Some floors are slippery. A mat helps you stay steady, so you don’t fall.
  • Saves your rope: Believe it or not, rough floors can wear out your jump rope! A mat keeps it nice and smooth.
  • Makes it quieter: If you live upstairs (hello, apartment friends!), a mat can cut down on the loud thumping.

Jumping on a mat is like giving your body a big hug while you workout. Sounds good, right?

Using a mat also keeps your home gym in better shape. It stops scuff marks and scratches from happening. If you’re renting, your landlord will be pretty happy about that!

Plus, if you jump outside, mats protect your rope from getting torn up by rocks, dirt, and gravel. That means less money spent on buying new ropes.

What Kind of Mat Should You Use?

Not every mat is the same. Some mats are too soft, and some are way too hard. Here’s what to look for when picking your jump rope mat:

  • Thick but not squishy: About ½ inch thick is great!
  • Non-slip: You want a mat that grips the floor so it won’t slide away.
  • Durable: Pick a mat made for jumping, not just for yoga.
  • Big enough: Make sure it’s wide and long enough for you to move around a little.

Pro tip: Some companies even make special “jump rope mats” that are made to take a lot of pounding. They’re often heavier and built to last through all those double-unders and criss-cross moves.

When you’re picking your mat, think about where you’re jumping most. Inside? Outside? A little bit of both? Some mats are waterproof and weather-resistant, so you can take your workout to the park or backyard.

Can You Jump Rope Without a Mat?

Sure, you can! Lots of people jump rope without a mat every day. But if you plan to jump a lot, a mat can make a big difference. It’s like choosing to wear comfy sneakers instead of flip-flops for a long walk — your body will thank you.

Without a mat, you’re more likely to feel aches and pains after you jump. Especially if you’re on hard floors like wood or concrete. Over time, that extra pressure can lead to sore joints, or worse, injuries.

We’re all about having fun and staying strong, not hurting ourselves. So if you want to jump rope often, it’s definitely worth getting a mat.

Benefits of Using a Jump Rope Mat

Here’s a quick look at all the good stuff that comes with jumping rope on a mat:

  • Less pain in your knees and ankles
  • Longer-lasting ropes
  • Less noise (your downstairs neighbors will love you!)
  • Safer jumps with less slipping
  • More energy! Less shock to your body means you can jump longer.
  • Protects floors from damage
  • Works inside or outside
  • Helps you stay consistent with workouts

We all want to stick with our fitness goals. Little things, like using a mat, help make jumping rope more fun and less of a pain (literally!).

Consistency is key. If you’re comfy, you’re more likely to jump day after day. And more jumping means stronger muscles, better cardio, and maybe even a little boost in confidence!

Tips for Jumping Rope on a Mat

Ready to give it a try? Here are some easy tips:

  • Pick a flat surface. Even the best mat can’t fix a bumpy floor.
  • Wear good shoes. Cushion your feet even more.
  • Warm up first. Get your body ready before you start jumping.
  • Start slow. Feel out the bounce of the mat before you go full speed.
  • Have fun! Jumping rope is supposed to make you smile, not stress you out.

You might notice that jumping on a mat feels a little different at first. That’s normal. Take a few sessions to get used to it. Then you’ll wonder how you ever jumped without it!

Another smart tip: every once in a while, check your mat for any rips or wear. A beat-up mat can be slippery, which you don’t want when you’re moving fast.

Common Mistakes to Avoid

When you’re using a mat to jump rope, here’s what you don’t want to do:

  • Choosing a squishy mat. Your feet will sink, and it’ll feel weird.
  • Using a tiny mat. You’ll feel cramped and maybe trip.
  • Jumping too high. Small jumps work best. Think “soft and quick.”
  • Skipping your warm-up. Always get your muscles ready to move.
  • Not wearing the right shoes. Barefoot jumping can hurt, even on a mat.
  • Not cleaning your mat. Dust and dirt can make it slippery over time.

Jumping rope is a skill. It takes time to feel smooth and fast. If you’re patient and practice often, you’ll get better and better.

How to Pick the Best Jump Rope for Mat Workouts

It’s not just about the mat. The right rope helps too! Here’s what to look for:

  • Durable material: PVC ropes are great for mats.
  • Ball bearings in handles: They make spinning smoother.
  • Adjustable length: You want the rope just the right size.
  • Comfortable grips: So you can jump longer without hand pain.

Using a mat is already easier on your rope. But the right jump rope makes everything even smoother.

Pro Tip: If your rope starts fraying at the ends, you can sometimes trim it a little to make it last longer.

Other Fun Things You Can Do With a Jump Rope Mat

Your mat isn’t just for jumping! Try these fun ideas too:

  • Stretching: Use your mat to stretch before and after jumping.
  • Strength moves: Like lunges, planks, and push-ups.
  • Yoga: If your mat is thick enough, you can even flow through a little yoga after your workout.
  • Core work: Sit-ups, crunches, and mountain climbers feel better on a cushy mat.

It’s like having a mini gym floor right in your home!

Should you jump rope on a mat?

Yes! Using a mat can protect your joints, save your rope, and make jumping a lot more comfortable.

About 10 minutes of jumping rope can be like running an 8-minute mile, giving you a great cardio workout fast.

A good workout mat or a wooden floor is ideal because they give you just the right amount of bounce and protection.

Jumping rope burns lots of calories, and while you can’t spot-reduce fat, it can definitely help you lose overall body fat, including belly fat!

Jumping rope is awesome all by itself. But adding a mat under your feet? That’s like putting sprinkles on your ice cream. It makes it even better!

So if you want to protect your body, make your workouts quieter, and enjoy jumping even more, grab yourself a mat and give it a shot. Just remember, we’re not doctors, so listen to your body, take breaks, and have fun!

And hey, if you trip over your rope sometimes, welcome to the club. We’re all in this together!

Keep jumping, keep smiling, and take care of yourself — one hop at a time!